Old Shed Removal is a tricky task, but it can be done! There are many options when it comes to getting rid of an old shed: hiring a pro, taking the DIY route, or trying to sell it.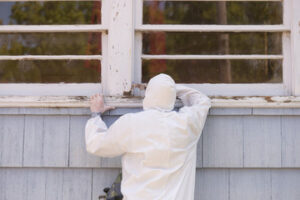
It’s essential to start by emptying out the shed and removing non-structural items such as windows, doors, and shelving. Once the shed is emptied, you can begin dismantling the frame.
When it comes to shed demolition and removal there are a number of factors that need to be considered. For instance, the way it is attached to the ground and other structures; its attachments with electricity, water and gas and how much of the structure is made from different materials. All of these elements will affect the overall cost of the shed’s demolition and disposal.
The first step is to identify potential hazards in the shed before starting demolition. This will include assessing things like mold, insect damage, lead paint and asbestos. Once these hazards have been identified it is important to shut off any electricity in the shed and disconnect any water or gas lines. It is also a good idea to wear the appropriate safety gear for any project that could involve hazardous materials.
Next, start by removing any non-structural elements of the shed such as windows and doors. This is usually a very quick process and can be done by opening the doors and hitting them on the hinges with a sledge hammer until they fall off and are no longer attached to the shed. Once this has been completed the roof can be removed. The roof is often the heaviest part of the shed and can take the longest to remove due to the amount of shingles that need to be dismantled.
Once the roof has been removed, the walls of the shed can be dismantled. It is best to work from the front of the shed that had the door as it will be the least structurally sound. Begin by removing any connections with the floor and then start taking down each wall. The nails in the walls will need to be removed with a claw hammer and then placed to one side so they don’t get broken during the dismantling process.
Once the shed is fully deconstructed, it will be necessary to dispose of the wood and concrete components. It is likely that there will be a large quantity of reusable wood and lumber parts from the shed that can be reused for other projects, so it’s important to make sure that these are separated before throwing away the rest of the structure. This is especially important if you are planning on rebuilding the shed or using it for other purposes.
Walls
Sheds are often used to store equipment such as gardening tools, lawn mowers, snow blowers and shovels but if a shed is in a state of disrepair or is too small to meet a homeowner’s storage needs it may need to be removed. Damaged sheds pose a safety hazard to those working on them and can collapse easily resulting in injury. Sheds also have the potential to contain dangerous materials such as asbestos which can be toxic if inhaled.
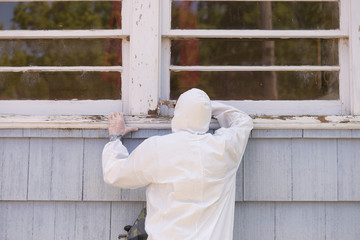
The first step in dismantling a shed is to remove any doors or windows. This is important to prevent injury from broken glass and will make the shed wall panels lighter making it easier to remove.
After the doors and windows have been removed the next step is to remove the walls. A sledge hammer or pry tools can be used to knock down the walls but be sure to avoid hitting any support beams as this could cause the shed to collapse on you. Once the walls are down you can then start removing any roof tiles or sheet metal that are attached.
When removing the roof it is a good idea to check the weather forecast and try not to be doing this when there are strong winds as this can make the partially dismantled shed unstable. Once the roof is removed it is then a good idea to put in place any braces that can be used to stabilise the shed while you continue dismantling it. These can take the form of timber braces screwed into the floor and wall or plan braces that are fixed across the corners of the shed.
Once the shed has been dismantled it is a good idea to clean up any debris and dispose of it appropriately. It is also important to note that any electrical, water or gas connections will need to be disconnected and this can be tricky. Depending on the condition of the shed it is likely that some parts will be reusable and can be used to rebuild a new shed.
Floor
Depending on the material, the floor of the shed may require different steps to remove it. A professional shed removal company will have the tools and equipment to handle this task quickly. They will also be able to recycle or dispose of the old materials properly. If you are doing the demolition yourself, be sure to wear sturdy gloves and work with a partner. You should also avoid touching any rotten wood as it can crumble or splinter.
Start by removing any non-structural elements from the shed, including shelving and storage, windows and doors. You should also disconnect any power outlets before starting the demolition process. Next, you should remove the roof and dismantle the connections between the shed walls and floor. You should then begin tearing down the shed itself, working from top to bottom. Once the shed has been taken apart, you should clean up any debris that has fallen throughout your yard.
Shed floors can be made from a number of materials, but most are constructed using wood. Whether the floor is made from wood or concrete, it should be free of any standing water. This is because moisture can cause the shed floor to rot and collapse.
If you want to prevent this from happening, install gutters on the shed roof. This will help to drive away the rainwater, which can then flow down the drainpipes and into the ground. In addition, it is a good idea to keep the surrounding area of the shed clean and free from vegetation. This will help to prevent the growth of pests, which can also weaken the shed floor.
Once the shed has been dismantled, it is important to check with local regulations to see if a permit is required. If a permit is required, it is best to contact a professional to ensure that the shed is removed in accordance with local laws and regulations. It is also a good idea to find a suitable place on your property where you can store the shed debris until it can be removed by a professional.
Concrete
Sheds are usually built on concrete foundations. This makes it harder to remove the shed. In addition, a standard pickup truck is not sufficient to haul all of the debris that comes with removing a shed. A dump truck or a larger trailer is necessary to haul away the junk.
The first thing you need to do is empty the shed completely. This will help make the demolition much easier. Also, it will save you money on junk removal costs.
Next, it is important to carefully go through the shed and determine which items will be kept, recycled, or disposed of. If you want to keep certain items, it is important to mark them as such so they are not included in the junk removal process. It is also a good idea to ask the junk removal company whether they offer senior citizen, military, or student discounts as these can help offset the cost of your shed removal project.
It is a good idea to start the shed demolition by removing the roof. This will help you to save a lot of time and money by eliminating the need for extra labor. You will need to carefully dismantle the walls as you go along, so be sure to take your time and use the proper safety equipment. It is also a good idea to remove any windows that are still in the shed. These can be reused or recycled, so it is not a waste to get rid of them.
Once you have removed the roof, you can begin to remove the shed walls. You will need to remove any connections from the floor, so be sure to use your pliers or an adjustable wrench. If the connections are not easily removed, you can try using a reciprocating saw. Once the walls have been dismantled, you can begin to knock them down with a sledgehammer.
After the walls have been taken down, you can begin to dismantle the flooring. If the shed has wood flooring, you can use a crowbar to pry it up. If it is a concrete slab, you can simply remove it by breaking up the concrete with a sledgehammer.